Using Djibouti’s Climate

It gets hot in Djibouti. The average high in the coolest months is in the mid-80s (F), and lows then drop all the way to the mid-70s (chilly!). In the hotest months, we’re looking at 105+ for average highs, and 90s for average lows. When you factor in humidity (I’ve seen it as high as 80% in the morning), even the cool streak we’re having now (overnight lows got down to 82), can be pretty miserable.

Still, there are some advantages. For one, making yogurt. The current recipe we use involves mixing powdered milk at about 1.5 times what you would use for drinking milk (so, 120 grams of milk powder for 800 grams of water at 100-108 degrees) plus a couple of spoons of yogurt starter. Mix thoroughly and put in an insulated bag outdoors for four or five hours. The insulated bag is at least partially to keep the yogurt from getting too hot.

Another trick we’ve used is defrosting frozen veggies outdoors. Placed in a sealed metal bowl, they thaw much faster than they would indoors, especially when the sun hits the bowl.

So yes, even though it gets hot and sticky here, there are some definite advantages, or at least opportunities.

January Birthdays

Duckling Number Six shares a birthday month with both her mother and her maternal grandmother. It’s a good thing all the birthdays fall within the Carnival season (that is, before Lent).

My wife was craving chocolate and orange for her birthday. I made this chocolate olive oil cake from Smitten Kitchen. I doubled it to make two layers and subbed in orange juice concentrate for half the liquid (plus a couple of drops of orange extract). I wound up underbaking it some, so the layers were fall-apart tender, but wow, it was like a chocolate truffle. That, and the quick cream cheese icing made for a phenomenal birthday celebration. Given the fall-apart tenderness, it wasn’t much to look at, so no pictures, but my wife is considering asking for a repeat next year.

Duckling Number Six got a tres leches cake for her first birthday (the recipe I use comes from The Pioneer Woman, but there isn’t a whole lot of variation in the recipes). We were able to share the morning with her godparents, and everyone, including the birthday girl, enjoyed the cake. Again, no pictures because it isn’t much to look at (and it’s hard to do any coherent decorating on straight whipped cream), but a bunch of happy campers.

We didn’t do cake for my mother-in-law, but did observe her birthday with some ice cream in her honor, as well as a phone call to sing Happy Birthday, as is the tradition.

Happy carnival to everyone (but remember, Lent is coming)!

Birthday Dinner

Dinner for my birthday was:

Falafel:

Falafel

I generally follow the recipe from Serious Eats, where you work with raw, soaked chickpeas rather than pre-cooked.  The falafel really do come out shatteringly crisp.  I also used coconut oil to avoid the lingering fried food smell.  We served these with pita, spinach, whipped feta, and tahini/lemon sauce.

For desert, mint/chocolate cheesecake in layers:

Cheesecake in Layers

It didn’t come out nearly as pretty as the template recipe at Smitten Kitchen (there a mocha cheesecake).  Instead, I went with a mint layer and a chocolate chip layer.  For the crust, I used another Serious Eats recipe for the shortbread cookie part of the copy-cat E.L. Fudge cookies.  I probably could have baked the crust a little bit longer to get it more crisp to go with the cheesecake, but I think it turned out OK.  There weren’t really any complaints from around the table, so we’ll call it a success.

Iced Coffee with an Aeropress

I am a huge fan of my Aeropress coffee maker. I like that I can do one cup at a time (which cuts down on waste) and that you can tailor the strength cup to cup (by changing the amount of coffee grounds you use, how much water you add, or both). Now that we’ve entered hot and sticky DC area summer, I’m using the Aeropress to make iced coffee.

A friend described the Aeropress as a cross between a pour-over and a French press. It is, sort of. Essentially, you put a filter on the end of a cylinder, put the coffee grounds in, balance the cylinder on your mug (it has a flange to keep it stable) then add the hot water. Once you have the right amount of water for your brew, you put the plunger on and press the water through. This way, the filter retains the grounds, and the brewed coffee goes in your cup. Actually, the company calls it espresso, which is a little bit of a stretch, but it is certainly strong. You can then dilute it with hot water, for an Americano-type coffee. It’s faster than drip or pour-over, and far less sediment than a French press.

For iced coffee, you follow the same process, but add ice to your mug before brewing. I usually fill my mug about half to three-quarters full with ice. Less if I want to add milk, more if I’m planning for black. The hot coffee hits the ice, melts most of it, but gets cooled almost instantly, which avoids the stale taste you sometimes get with iced coffee.

Well worth it for a little summer indulgence. Good thing I fixed our ice maker just as the summer was getting hot.

Thumbkin Turns Two

Thumbkin turned two last week.  It’s hard to believe it’s been that long since his birth, but he (and the other kids) have certainly kept us hopping.

Since his birthday falls in Easter season (actually in the Octave this year), the celebration just keeps on going.  It’s fitting, then, that his favorite word is “Alleluia,” which he says every chance he gets.  Actually, I’ve heard him say it in his sleep while napping.  Yep, he’s our Easter boy for sure.

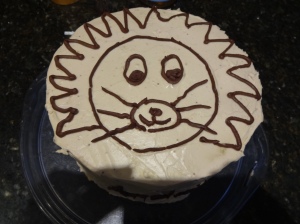
The older kids were on spring break, I took the week off work, and his grandparents came for a visit to help celebrate.  Since he was turning two, I gave him his first haircut, calling it a “big boy” haircut.  It’s basically a bowl cut (done without the bowl), but it does make him look much older (and, incidentally, like his older brother).  The day before his birthday, we took trip to the zoo where we made sure to stop at the lions (his current favorite animal).  On the day of, we had pancakes for breakfast and pizza for dinner (his favorite foods, both of which we did not do during Lent) and a banana cake (recipe at Smitten Kitchen), decorated with a lion, of course.

I believe he felt adequately feted, especially for a two-year-old Alleluia boy. DSC08010


Fudge, Finally

Based on multiple attempts, I’ve determined that I am not a confectioner.  I’ve tried to make different candies and such, but things more often than not go sideways.  This isn’t a bad thing, necessarily, but it is an interesting limitation to know and try to overcome.  The opportunity presented itself in the run up to New Year’s Day, when we were getting ready to have people over for hoppin john, cornbread, and a house blessing.

I was looking for some sort of dessert/sweet to make to have on hand for some friends of ours who have to be gluten free.  I also had on hand several bars of semisweet and unsweetened baking chocolate that needed to be used.  Sure enough, in the book CookWise by Shirley O. Corriher, was a recipe for fudge.  Several, actually, to include traditional, marshmallow, and microwave varieties.  I opted to try the microwave recipe because of the low time investment–about 5-10 minutes max, all told, of active work.  What makes this work is the sweetened condensed milk, which has all the sugar already in it, and much of the water already taken out of the milk:

1-14 oz can sweetened condensed milk

7 oz milk chocolate chips [I had 60%, which is in the semisweet category]

11 oz semisweet chocolate (bar or chips) [this is where I used some semisweet and some unsweetened]

1 tsp vanilla

[I omitted the nuts, but she gives directions to roast one cup of pecans or walnuts in the oven, then, once done, stir in a tablespoon of butter and a sprinkle of salt.]

Line an 8×8 pan with buttered foil.  Combine condensed milk and chocolate in a large glass bowl or 4-cup measuring cup and melt in the microwave at 50% for about 3 minutes, stirring frequently.  As soon as the chocolate is melted, stir in the vanilla (and nuts, if using), and pour into the prepared pan.  Refrigerate to cool and set.  Once set, remove from pan, peel off foil, and cut into squares.

Since I used mainly semisweet, and not milk chocolate, this set up really firm.  Not too hard, but definitely on the firm end of the fudge spectrum, especially when it was kept in the fridge.  I was worried that it would be grainy because I overstirred it, trying to make sure the chocolate was all melted (and to keep the sugar crystals small, which is what gives fudge its texture) and it started to look curdled.  I didn’t need to worry–the sugar in the condensed milk is already entangled with the milk proteins, so can’t form large crystals.  The curdledness disappeared when I poured it into the pan, and didn’t affect the final texture.   It went over well with all the guests, so I would say it was a success.

Finally, I’ve managed to conquer fudge.  Not that it’s something to make every week (or month, even), but it is nice to have a quick and easy sweet treat recipe on hand.

Gingerbread Birthday Angels

The twins spend a lot of time with the track/cross-country team at the kids’ school.  They aren’t old enough to participate, but, since we help out with practices, they wind up being sort of honorary members of the team.  This year, since their birthday was on the last day of practice before the final cross-country meet of the season, they decided they wanted to share cookies with their best buddies on the team.  Specifically, they wanted gingerbread angels.

I wound up baking two batches, because we determined one wouldn’t be enough for the entire team, plus younger siblings who had been invited to the final practice, plus any adults who were there volunteering to help out.  After I counted out the five dozen for practice, there were just enough to spell out “Happy Birthday”, plus their initials.  This turned into the dessert to share with one of their godfamilies (the other family couldn’t make it).

I modified the King Arthur Flour gingerbread cookie recipe by amping up the spices.  The original recipe calls for 2 tsp each of cinnamon and ginger, and 1/4 tsp cloves.  Because we like a spicy gingerbread, I doubled the ginger and cinnamon (4 tsp each), and put in 2 tsp cloves.  I also added about 1 tsp finely ground black pepper.  I also used whole wheat flour, and added some additional to try and get a stiffer dough.  Really, this dough does need to chill so that you can roll it–the added flour didn’t actually do anything for the first batch.  However, once it is chilled, it rolls really easily.

Because the twins wanted the angels decorated, and because I was a little worried the cookies would be too assertive for a more general population, I went with the Serious Eats royal icing recipe for the halos and wings.  This recipe is easy to make, and really does pipe smoothly.  It doesn’t taste too bad, either.

The final verdict?  A smashing success.  The twins were very happy to share the cookies with their friends, and delighted when we pulled out the Happy Birthday batch after dinner.  The cross-country team loved the cookies, even if they were on the spicy side.  So, happy kids all around, and I have a good gingerbread cookie recipe all set for the upcoming Christmas baking season.

Benson’s Saturday Evening Spot

Cats like routine.  Lavash and Benson are our secondary alarm clocks–they know breakfast is at 0600, so start to get worried and make noise at about 0530 if we aren’t up and moving by then.  Lavash gets annoyed when we come in the back door when we get home from mass, since that messes with her plan to flop down on the carpet by the front door for belly rubs.  Curiously, this only happens on Sunday, so I suspect belly rubs are part of her after post-post breakfast nap routine.

Benson likes Saturdays since I almost always make pizza.  Not only does he try to steal a slice, or select toppings (like kale), he gets to hang out on top of the cabinet above the refrigerator.

DSC07400

I assume the view must be pretty good from up there, especially as a look-out spot for dropped pizza toppings of interest.

Checkerboard Birthday Cake

Ikinji recently turned nine, and we had a board games-themed party for him and a few of his friends.  Fortunately for us, only a couple of his friends were able to come– I think the noise level gets exponentially louder with each additional guest, especially after they’ve had a nerf gun battle at the park nearby.

In any case, keeping with the theme, I made a checkerboard cake.  There are surprisingly few tutorials online for how to do a rectangle checkerboard.  There are plenty for circular cakes, since it won’t matter which side you cut into–each wedge of cake will have the pattern, which is usually made by cutting concentric circles out of your cakes and fitting them back together in an alternating pattern.  For the rectangular cake, I cut strips of cake, approximately 1″x1″x9″ (the width of the cake) and stacked them alternating yellow-chocolate-yellow.  I used seven minute icing to stick the pieces together (and stick they did!) and german buttercream to frost the outside.

DSC07381

Checkerboard around the outside hints at what’s inside.  The top, by the way, had a chess piece piped on in chocolate.

As an added wrinkle, my wife suggested that each slice have a 9×9 grid, so that you could play tic-tac-toe with white and dark chocolate Reeses Peanutbutter Cups.  This required marking the outside with where the pattern repeat occurred.  I used a thicker line of icing for the outside checkerboard to indicate where to cut.  While it isn’t an exact match to the inside, this actually worked out pretty well.

DSC07390

Checks on the outside, checks on the inside. This is after most of the cake has been cut and eaten, hence the messy cake board.


What surprised me most was how quickly this came together once I had figured out how it would come together.  I had to bake two 9×13 vanilla cakes to get enough of the white, and one 9×13 chocolate.  If I had it to do over again, I would have cut .75″ rectangles to allow for loss during cutting, and to have a slight margin of error.  As it was, I had to use a leftover frozen chocolate cake for the last strip.  Still, the cutting and assembly went very quickly.  Also, since the frosting on the outside wasn’t too elaborate, that came together rapidly as well (which was a good thing, since I was frosting it the morning of the party.

The final product elicited the desired effect:  the boys were impressed, especially Ikinji, who didn’t know what we had planned.  The kids’ parents were pretty impressed, too, but the “Wow, neat!” I got from the kids was well worth the effort.


Medoviy Torte Birthday (Honey) Cake

Unlike last year’s very rushed birthday cake, I left myself plenty of time this year to make my cake.  I took the entire week off work, mainly because we were coming back from Colorado, but also to ensure I would have some time to work on this year’s recipe:  Russian Honey Cake, or Medoviy Torte.

When I was in Dushanbe, the Korean-Tajik ladies who ran the (tiny) cafeteria would serve this daily.  We would also get it in Turkmenistan, but it was less common there.  After I saw the recipe on Smitten Kitchen, I knew I wanted to try and recreate it.

As I said, I gave myself plenty of time to work through this one.  I was prepared for an honest-to-goodness full day marathon of working in a hot kitchen.  I even recruited Ikinji to help.  I mean, the recipe includes a stovetop portion before you even roll out the layers and bake them.  As it turns out, the actual flow of the recipe is not that difficult, and it goes pretty easily.  Even though I had Ikinji help with trimming the layers into perfect rounds (by tracing around a plate) one person can easily do everything.

The main change I made (other than using whole wheat flour, which I do in everything (except angel food cake)), is to use greek yogurt instead of the sour cream.  At least one of the comments on the recipe aludes to the fact that Russian (and post-Soviet territory) sour cream is much, much thicker than what we get.  It really is much closer to greek yogurt (that is, yogurt that has had most of the whey drained out) than the sour cream you buy here.  Also, rather than using sweetened condensed milk, I wanted more of a honey flavor, so I wanted to sub all honey for the condensed milk in the recipe.  Well…I only had about half the honey I needed, but I went with it anyway.  This made the icing not nearly as runny, and not nearly as sweet.

I would call it a success.  I do want to try it again with the correct amount of honey.  Even though it was ready for my birthday itself, due to outside circumstances, we didn’t get around to eating it until two days later.  By that time it was almost too dry, since the layers had absorbed all the available moisture.  Taste-wise it was great, but the texture was a little off.  Still, since it isn’t as difficult to make as it would seem just by reading the recipe, I think it might be making a reappearance.